Configure Buttons #
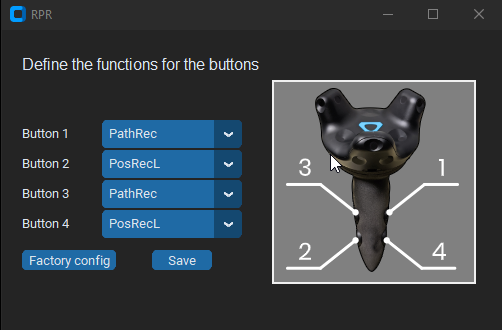
The Easy Automator App enables you to define the functions of the hardware buttons, as you wish. As the Easy Automator Teach Pen is a symmetrical device, right-handed and left-handed user can use it the same manner.
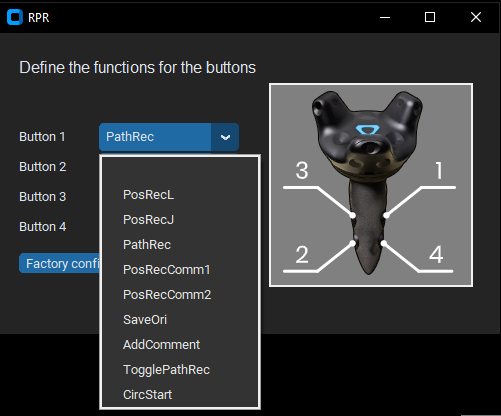
Each button can be configured with a dropdown menu and selecting the particular function to the button.

Button 1 – 4 #
For each button an individual function an be defined. The same function can be defined to multiple button, if this is preferred.
Factory config #
The easy and fast way to reset all buttons to the factory settings. Please be aware, once you push the button, there will be no additional verification but the factory button configuration will be applied. If you hit the button accidentally, you can still close this window without saving, so your old configuration will be kept.
Save #
Once the configuration of the buttons ready, it must be saved to become effective after a restart of the app.
Button functions #
From the dropdown menu, the required function can be easily selected.
To understand some of the following functions below we explain in short form some basic definitions:

PosRecL #
Records one single target/point by pressing the button. The position will be reached as a linear movement (MoveL).
PosRecJ #
Records one single target/point by pressing the button. The position will be reached as a joint movement (MoveJ).
PathRec #
To operate PRESS & HOLD the button. It will continuously record MoveL points. The distance, orientation change or speed change between 2 recorded points can be defined in the Options menu: Path Settings.
PosRecComm1 #
Inserts the corresponding Comment into the RoboDK program at the place where the button was pressed. E.g. “Spary gun on” – exactly at this point the spray gun will be turned on. For sure, the right command of the external device must be inserted manually, but you can place a placeholder for a predefined function. You can define the string in the Options menu: Add text 1
PosRecComm2 #
Inserts the corresponding Comment into the RoboDK program at the place where the button was pressed. E.g. “Spary gun off” – exactly at this point the spray gun will be turned off. For sure, the right command of the external device must be inserted manually, but you can place a placeholder for a predefined function. You can define the string in the Options menu: Add text 2
SaveOri #
Saves the master orientation for each point recorded later. E.g. for welding you might want to define a master orientation, in which angle the welding torch should stay compared to the surface of the workpiece. With this function you can define the master orientation. For all following points the X, Y and Z coordinates will be recorded but not the orientation (Rx, Ry and Rz) as it will be the defined orientation.
AddComment #
This function inserts a comment line into the RoboDK Program at the place where press the button. You can define the string in the Options menu: Comment text
TogglePathRec #
This function is very similar to the PathRec function. It records continuously MoveL waypoints. If the button willbe pressed the recording starts and continues until the same button will be pressed again. No need to Press & Hold the button during the recording.
It is a handy feature if the Easy Automator Pen is attached to a manual tool, e.g. powder coating gun and the user really processes a workpiece during the recording. There is no need to keep hold the button all time during the powder coating process.
First press: recording start.
Second press: recording stop.
CircStart #
Enables a MoveC movement and so a circular path can be recorded. The first point must already exist e.g. MoveL. At the first press of the button a point somewhere on the arc must be pointed. The second pressing of the button indicates the end of the arc. The arc will be calculated automatically.

The circular path is an arc created from the point where the robot is located, passing through the first circular point and ending at the end point.
Important: It is not possible to accomplish a full circle with only one circular instruction. A full circle must be split into two separate circular moves.
Quick help – Tooltip #
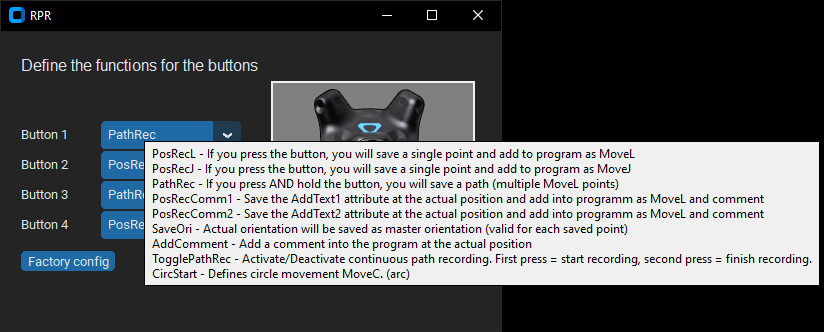
You can hover with the mouse over any of the functions from above and a tooltip will deliver quick and short hints about the functions.


