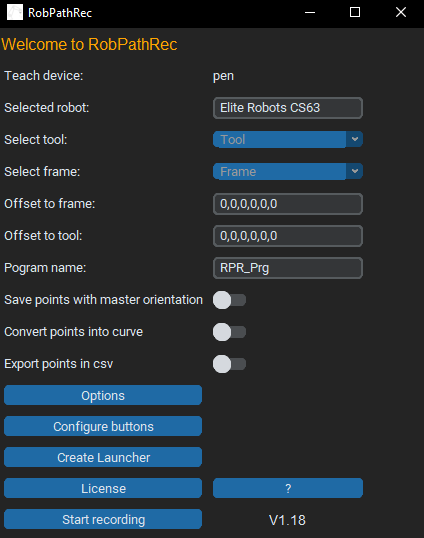
Main Screen #

Teach device #
It shows, which teach device is currently used. You cannot change the device on the main screen, for this you have to enter the Options menu, but you can double-check any time if the right teach device is chosen.
Selected robot #
If you use multiple robots in your project, you can double-check if the right robot is selected for the recording
Select tool #
If there are multiple tools are installed in your RoboDK station, you can select the appropriate tool ON THE ROBOT for the recording. If there is only one tool in the station file, the tool will be shown and you cannot select anything.
Select frame #
If there are multiple frames are installed in your RoboDK station, you can select the appropriate frame for the recording. If there is only one frame in the station file, the frame will be shown and you cannot select anything.
Offset to frame #
You can apply an offset relative to the frame. Format X,Y,Z,Rx,Ry,Rz. The first 3 values are position coordinates, the last 3 values are rotation coordinates. If you want to always use the same offset value, you can define it in the Options menu.
Offset to tool #
You can apply an offset relative to the selected tool. Format X,Y,Z,Rx,Ry,Rz. The first 3 values are position coordinates, the last 3 values are rotation coordinates. If you want to always use the same offset value, you can define it in the Options menu.
Program name #
If you activated the Create program automatically option, a robot program will be automatically generated during the recording. Here you can define the name of the robot program. You can change the robot program name later in RoboDK.
Save points with master orientation #
This can be useful for example for welding. You can define a “master orientation”, so an angle of the welding torch relative to the surface. Later, all other waypoints will be recorded with the master orientation, so you do not have to take care of the orientation during the recording.
X,Y,Z coordinates will be recorded, just like normal, and the defined master orientation will be applied to each created waypoint.
Convert points into curve #
You can create a curve out of the recorded points for advanced RoboDK programming.
Export points in CSV #
You can export the recorded points to a CSV file.
Options button #
Opens the Options window and enable advanced settings.
Configure buttons #
You can free define, which hardware button should control what function of the Easy Automator app.
Create Launcher #
A launcher is an advanced recording starter option. A script will be installed into your RoboDK station file. So, you can skip the main screen before the recording, or you can define in upfront, which tool or which frame should be used for the recording. You can create multiple launchers into the same RoboDK station.
This function helps to pre-define recording parameters for users they cannot or do not want to make any manual adjustments before the recording.


