Options #

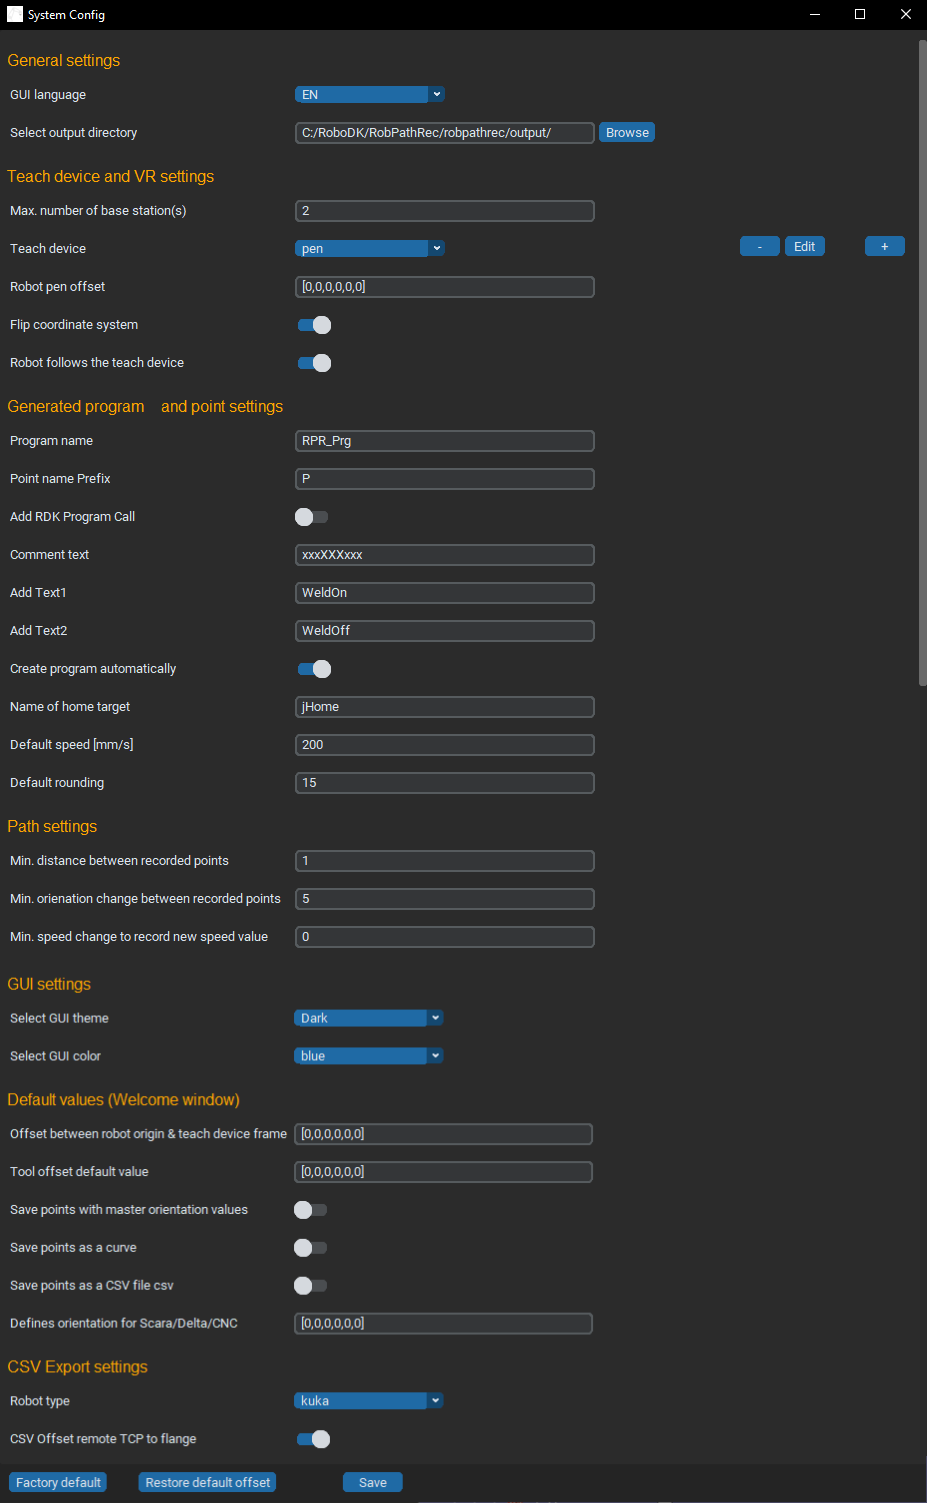
General settings #
GUI language #
A simple language selector.
Select output directory #
You can define here, in which folder generated files should be automatically saved.
Teach device and VR settings #
Max. number of base stations #
You can find 2 base stations in your Easy Automator Starter Kit. But you can use up to 6 base stations at the same time for your setup. You can define here how many base stations should be displayed on the recording window.
Teach device #
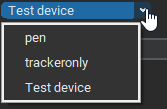
Easy Automator enables to set-up any manual device, like powder coating guns, spray guns, welding torches etc. for the recording. To calibrated manual tools will be displayed here and can be selected.
With the ![]() button you can remove saved manual tools.
button you can remove saved manual tools.
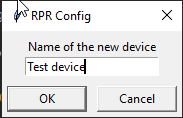
With the ![]() button you can add a new tool. In this case you have to define the offset of the tip of the Easy Automator Teach pen to TCP of your manual tool. The offset is defined: X,Y,Z,Rx,Ry,Rz
button you can add a new tool. In this case you have to define the offset of the tip of the Easy Automator Teach pen to TCP of your manual tool. The offset is defined: X,Y,Z,Rx,Ry,Rz
With the ![]() button you can rename tools or you can change the offset.
button you can rename tools or you can change the offset.


Flip coordinate system #
You can flip the coordinate system of the Easy Automator teach pen. It can be useful if a different tracker device is mounted on the pen. (E.g. HTC Vive Pro 2.0)
Robot follows the teach device #
If this toggle is activated, the digital twin of the robot in the RoboDK station file will follow the movements of the teach pen. If it is deactivated, the system gets more performant, but you cannot see any visual feedback on the screen during the recording.
Generated program and point settings #
Program name #
You can define the default value for a program name. This name will be applied if the “Create program automatically” toggle is active. You can change this on the main screen for the actual recording.
Point name prefix #
A prefix value for the Targets and points in the program.
Add RoboDK program call #
You can call built in RoboDK scripts and programs from the Easy Automator app.
Comment text #
Here you can predefine a comment text, which will be automatically inserted into the program, once you press the button. It is useful as a placeholder for remarks, so the comment will be inserted exactly there in the tree, where you need it.
Add text1 #
It is a command function as well. It makes sense if you want to control external devices during the recording. E.g. “START powder coating”
Add text2 #
It is a command function as well. It makes sense if you intend to control external devices during the recording. E.g. “STOP powder coating”
Create program automatically #
If the toggle is active, a robot program will be automatically created during the recording. We strongly recommend using this feature, so you can add comments, record speed and add instructions.
This feature converts the path recording pen to real controller of all your tools you require for the automation.
Name of home target #
A home position stored as a joint value is a must for the usage of Easy Automator. You can define here, how the home position in the station file is called. This is a case-sensitive value!
Default speed #
The default value for the speed of the robot is defined here. Please note that this value is a nominal value and Easy Automator cannot control if the robot is truly capable of fulfilling this speed value.
Default rounding #
This defines the default smooth value in RoboDK. The higher value makes the robot movement smoother but you lose accuracy between the waypoints.
0 means – NO smoothing is applied
You should play around with this value to see the real effects on your particular application. You can do this with the same recorded program, if you change the smooth value only and export the program with the different smooth values to the robot and you let it run.
You can adjust this value later in the RoboDK robot program.
Path settings #
Min. distance between recorded points #
This is the default value for the distance after Easy Automator will record a new point. If the value is 1, than after every 1 mm movement with the teach pen, a new point will be recorded. With a value of 10, every 10 mm will be a new point created.
You can optimize the robot program if you tune this value in combination of the smoothness (Default rounding).
Obviously, for smaller objects a smaller min. distance value better to reach accuracy. For bigger objects and less accuracy requirement this value can be cranked up.
The recorded points will be connected either via linear movement or circular movement, respectively, of the recording.
Min. orientation between recorded points #
Same function like the min. distance, but for the orientation. It defines in degrees the minimum orientation change of the teach device for the recording of a new point.
5 means 5°. That means, even if the teach-pen stays at the same position, but will be rotated by 5° a new point will be recorded.
Min. speed change to record new speed value #
If you decide to record the speed of the movements, this is the default value of the speed change to insert a new nominal speed value into the RoboDK program.
Example: You start with 200 mm/s as a default speed and 5 mm/s min. speed change to record new speed value. If the movement of the pen is slower than 5mm /s, no new speed value will be recorded, so the nominal speed stays 200 mm/s. But if the movement of the teach device is faster than 5mm/s between 2 recorded points, then a new speed value will be inserted into the program. E.g. the change was 8 mm/s than the new speed value in the RoboDK program will be 208mm/s.
You can change the speed settings with the Easy Automator speed adjustment tool in the afterwork if necessary. Please note: only recorded speed values can be changed. Alternatively, you can insert anywhere new speed instructions manually.
GUI Settings #
Select GUI theme #
Choose free between:
dark
bright
system default values
Select GUI color #
Choose the color scheme, which you prefer. You cannot create any custom color scheme.
Default values (Welcome Window) #
Offset between robot origin & teach device frame #
This is the default value for “Offset to frame”
Tool offset default value #
This is the default value for “Offset to tool”
Save points with master orientation values #
The default value for:
This can be useful for example for welding. You can define a “master orientation”, so an angle of the welding torch relative to the surface. Later, all other waypoints will be recorded with the master orientation, so you do not have to take care of the orientation during the recording.
X,Y,Z coordinates will be recorded, just like normal, and the defined master orientation will be applied to each created waypoint.
Save points as a curve #
The default value on the welcome screen.
Save points as a CSV file #
The default value for: Export points in CSV
Defines orientation for Scara/Delta/CNC #
If you use a device which a Scara/Delta/CNC, you can define here the default tool orientation.
CSV export settings #
Robot type #
Select the robot specific CSV format for the export
CSV offset remote TCP to flange #
???
Buttons #
Factory default #
Reset everything to the value, which was set as a default during the very first installation.
Restore default offset #
Reset the offset values to the factory default values.
Save #
If you apply any change, you have to save it to be effective. Please keep in mind: after hitting the save button, you have to restart the application to take effect of the changes.


